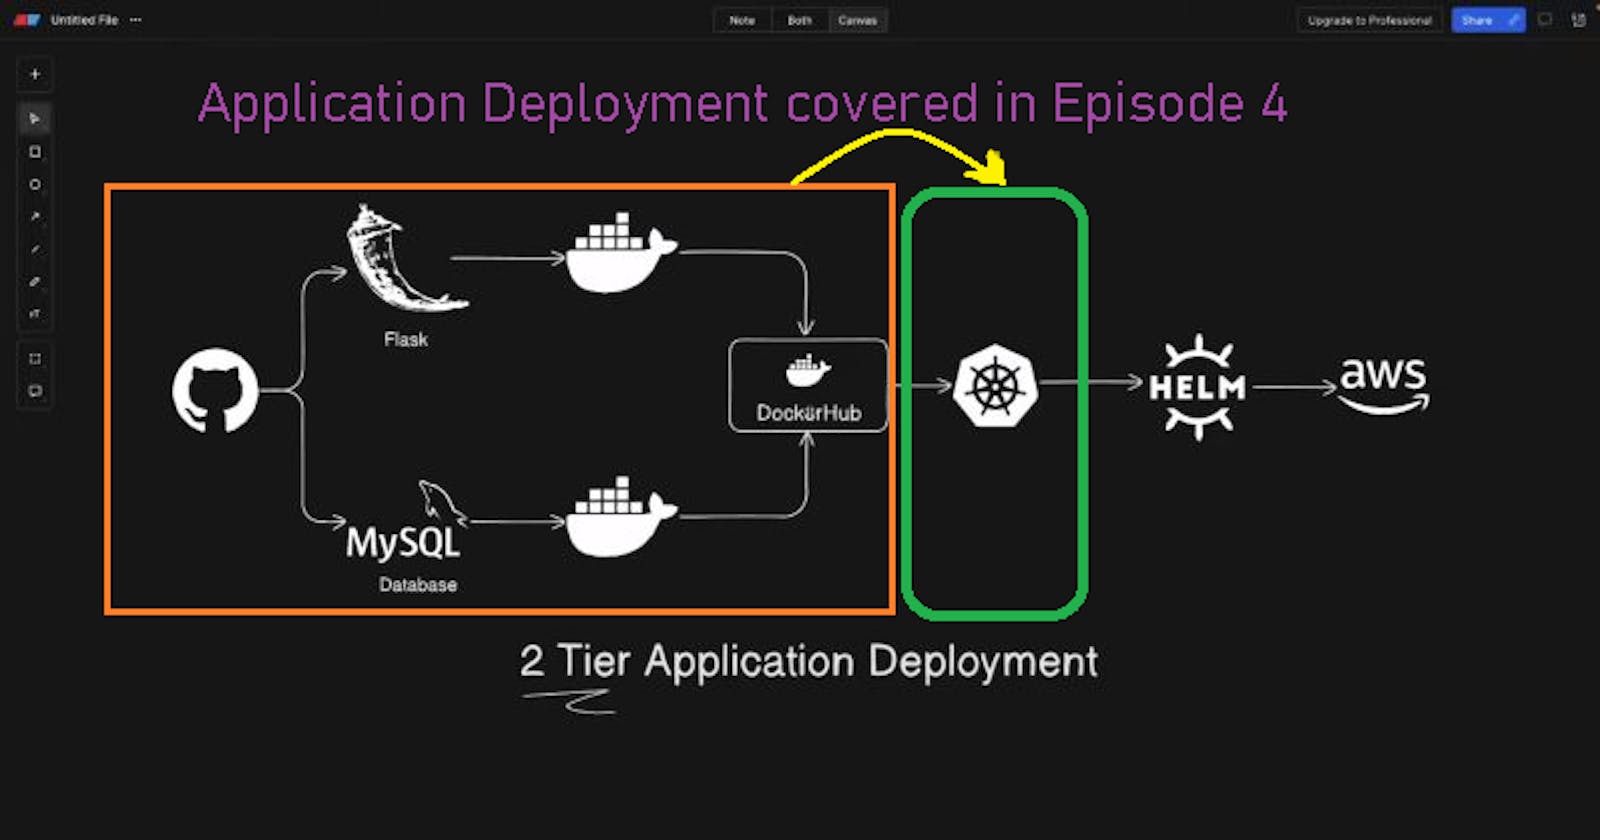


🔱 Introduction :
Kubernetes has emerged as the standard for container orchestration, it allows developers to efficiently manage and scale their applications. In this blog, we will walk you through the process of deploying a 2-tier Flask application using Kubernetes. This setup will consist of a frontend/backend and Database tier, each running in separate containers within a Kubernetes cluster and how these containers communicate. At the end of this guide, you will have a scalable and auto-healing feature architecture for your Flask app.
🔱 Setup Kubernetes cluster:
I have already set up a Kubernetes Cluster with master and worker nodes.
If you want to know how to create kubeadm cluster, follow the below link.

🔱 Docker Images:
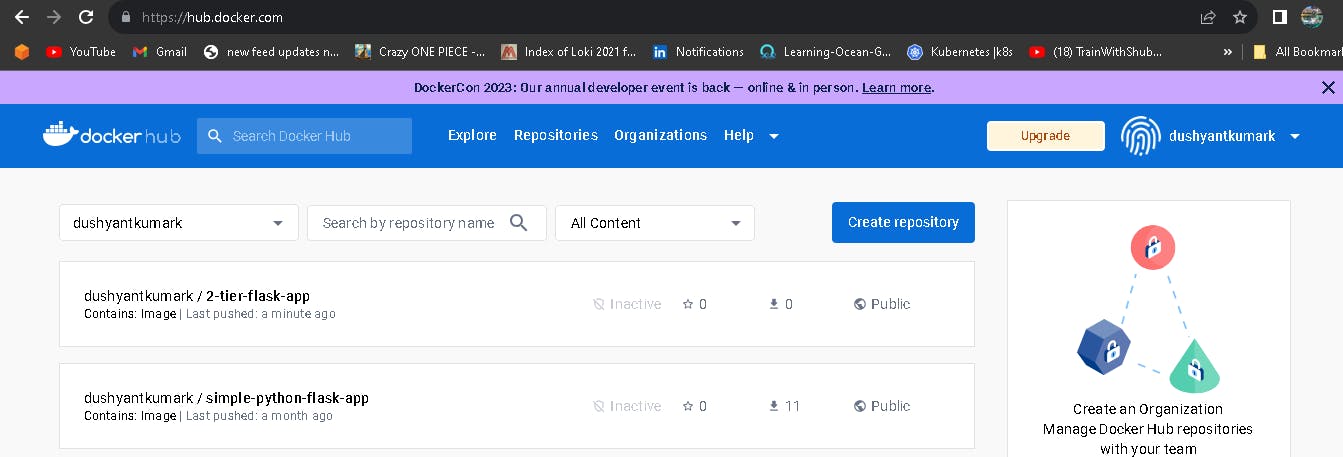
- I have already pushed the Docker images into the Docker hub, I will use these images to deploy the application. If you want to know how to create, build and push the image to the docker hub, then follow the link "K8S-Setup-Guide".
🔱 Deploying Your Application:
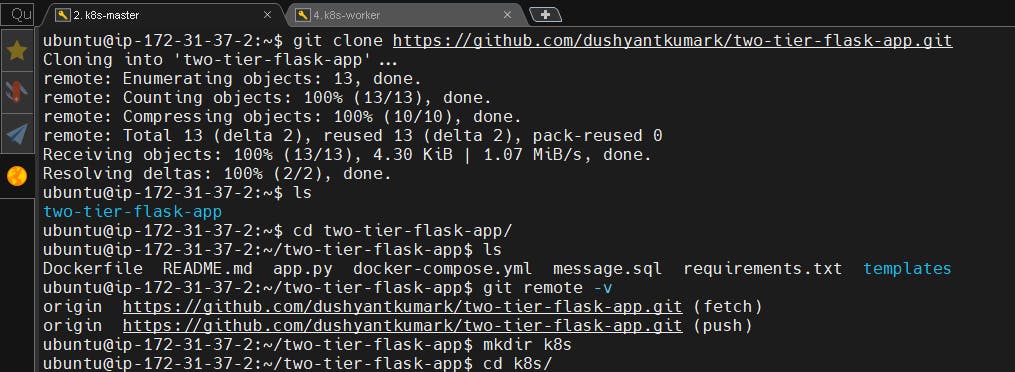
- Clone your repository code from Git Hub.
git clone https://github.com/dushyantkumark/two-tier-flask-app.git
cd two-tier-flask-app
mkdir mysqldata
mkdir k8s
cd k8s
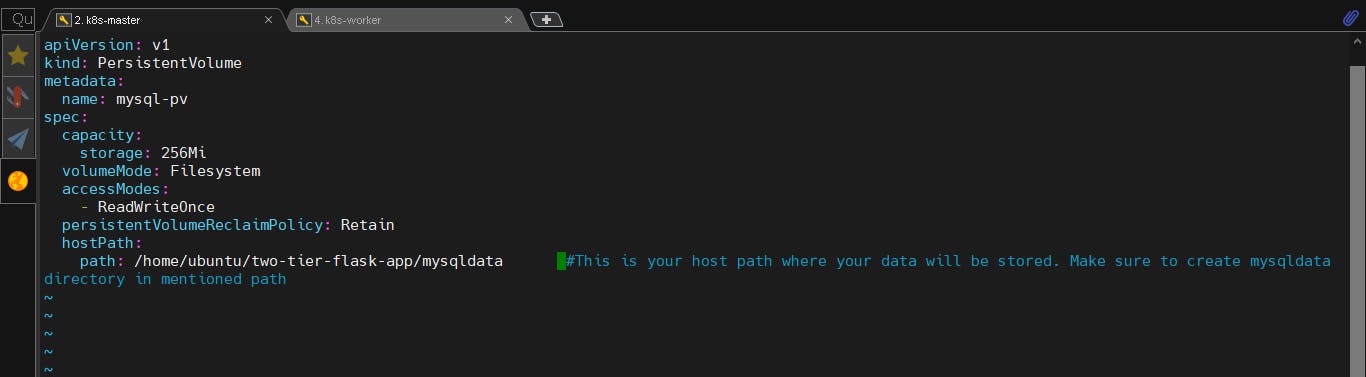
- Create a persistent volume manifest (mysql-pv.yml).
apiVersion: v1
kind: PersistentVolume
metadata:
  name: mysql-pv
spec:
  capacity:
    storage: 256Mi
  volumeMode: Filesystem
  accessModes:
    - ReadWriteOnce
  persistentVolumeReclaimPolicy: Retain
  hostPath:
    path: /home/ubuntu/two-tier-flask-app/mysqldata        #This is your host path where your data will be stored. Make sure to create mysqldata directory in mentioned path
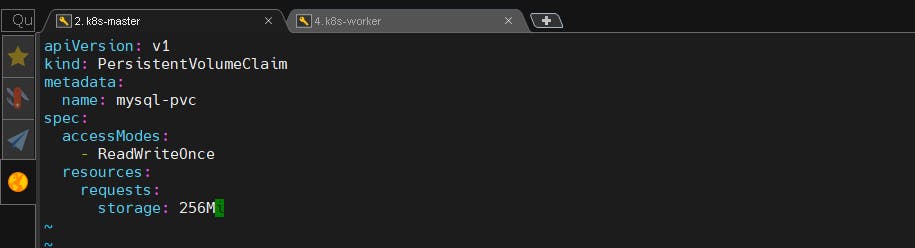
- Create a persistent volume claim manifest (mysql-pvc.yml).
apiVersion: v1
kind: PersistentVolumeClaim
metadata:
  name: mysql-pvc
spec:
  accessModes:
    - ReadWriteOnce
  resources:
    requests:
      storage: 256Mi
- Create a mysql deployment manifest (mysql-deployment.yml).
apiVersion: apps/v1
kind: Deployment
metadata:
  name: mysql
  labels:
    app: mysql
spec:
  replicas: 1
  selector:
    matchLabels:
      app: mysql
  template:
    metadata:
      labels:
        app: mysql
    spec:
      containers:
        - name: mysql
          image: mysql:latest
          env:
            - name: MYSQL_ROOT_PASSWORD
              value: "myadmin"
            - name: MYSQL_DATABASE
              value: "myDb"
            - name: MYSQL_USER
              value: "admin"
            - name: MYSQL_PASSWORD
              value: "myadmin"
          ports:
            - containerPort: 3306
          volumeMounts:
            - name: mysqldata
              mountPath: /var/lib/mysql   # this is your container path from where your data will be stored
      volumes:
        - name: mysqldata
          persistentVolumeClaim:
            claimName: mysql-pvc    # PVC claim name

- Creating a Cluster-IP Service for my Database:
apiVersion: v1
kind: Service
metadata:
  name: mysql
spec:
  selector:
    app: mysql
  ports:
    - port: 3306
      targetPort: 3306

- Create Kubernetes resources which are written in the YAML manifest.
kubectl apply -f mysql-pv.yml
kubectl apply -f mysql-pvc.yml
kubectl apply -f mysql-deployment.yml
kubectl get po   #check status of pods, youcan use (po or pods)

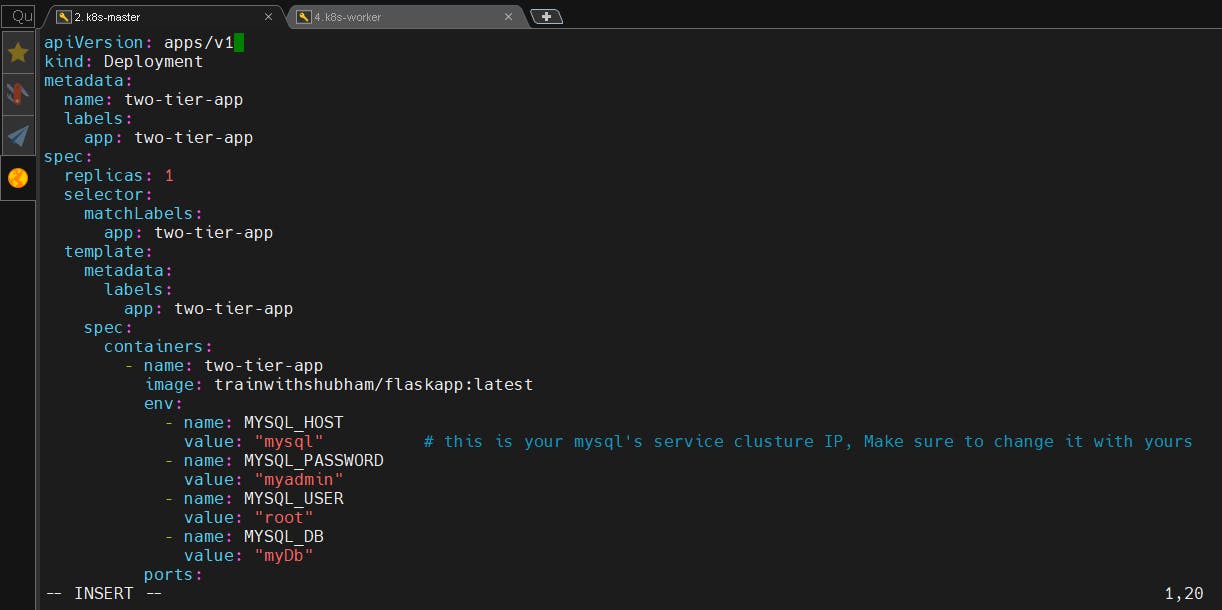
- Creating a Deployment File for Web app:
apiVersion: apps/v1
kind: Deployment
metadata:
  name: two-tier-app
  labels:
    app: two-tier-app
spec:
  replicas: 1
  selector:
    matchLabels:
      app: two-tier-app
  template:
    metadata:
      labels:
        app: two-tier-app
    spec:
      containers:
        - name: two-tier-app
          image: dushyantkumark/2-tier-flask-app:latest
          env:
            - name: MYSQL_HOST
              value: "mysql"
            - name: MYSQL_PASSWORD
              value: "myadmin"
            - name: MYSQL_USER
              value: "root"
            - name: MYSQL_DB
              value: "myDb"
          ports:
            - containerPort: 5000
          imagePullPolicy: Always
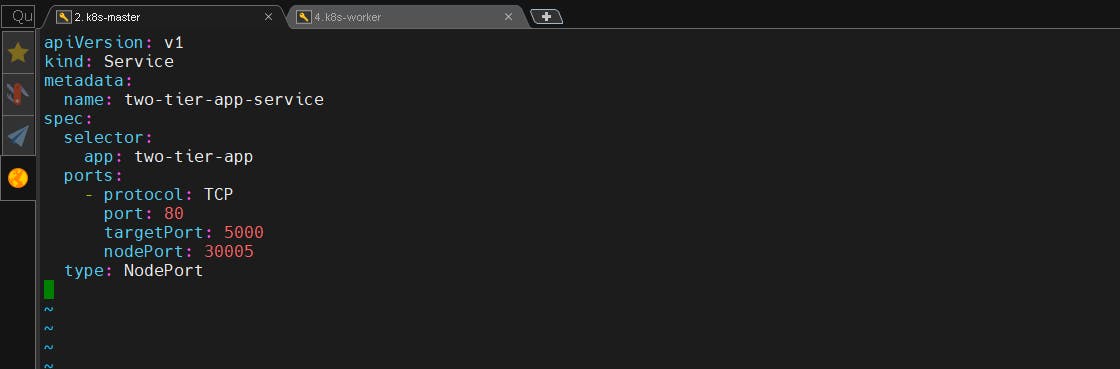
- Create a Nodeport Service to expose it to the external world:
apiVersion: v1
kind: Service
metadata:
  name: two-tier-app-service
spec:
  selector:
    app: two-tier-app
  ports:
    - protocol: TCP
      port: 80  # Internal Node port, container port traffic will be directed to this port
      targetPort: 5000 # Matches the containerPort of the Flask app
      nodePort: 30005 # Node external port, we access our web app on this port
  type: NodePort
- Create or Update Kubernetes resources which are written in the YAML manifest.
kubectl apply -f two-tier-deployment-app.yml
kubectl apply -f two-tier-service-app.yml
kubectl get po
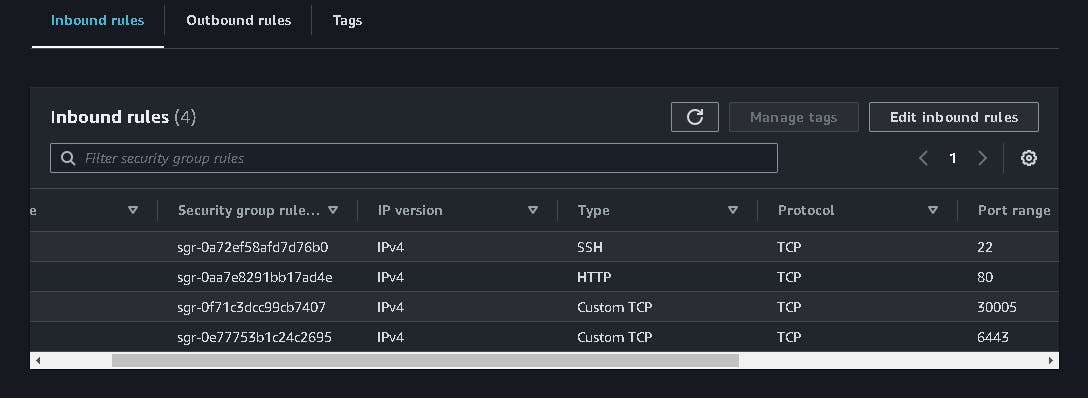
- Add a 30005 port to the worker node security group, to access our web app.
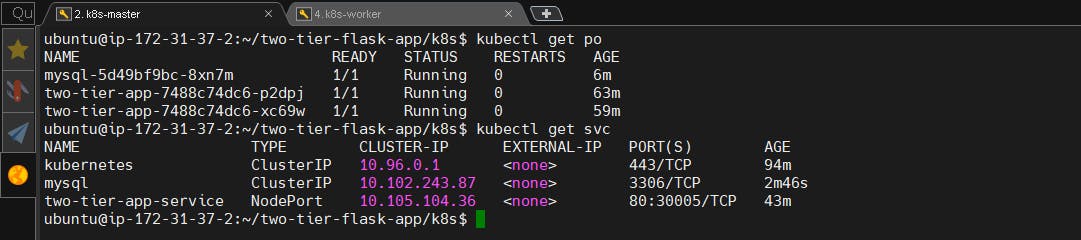
kubectl get po
kubectl get svc
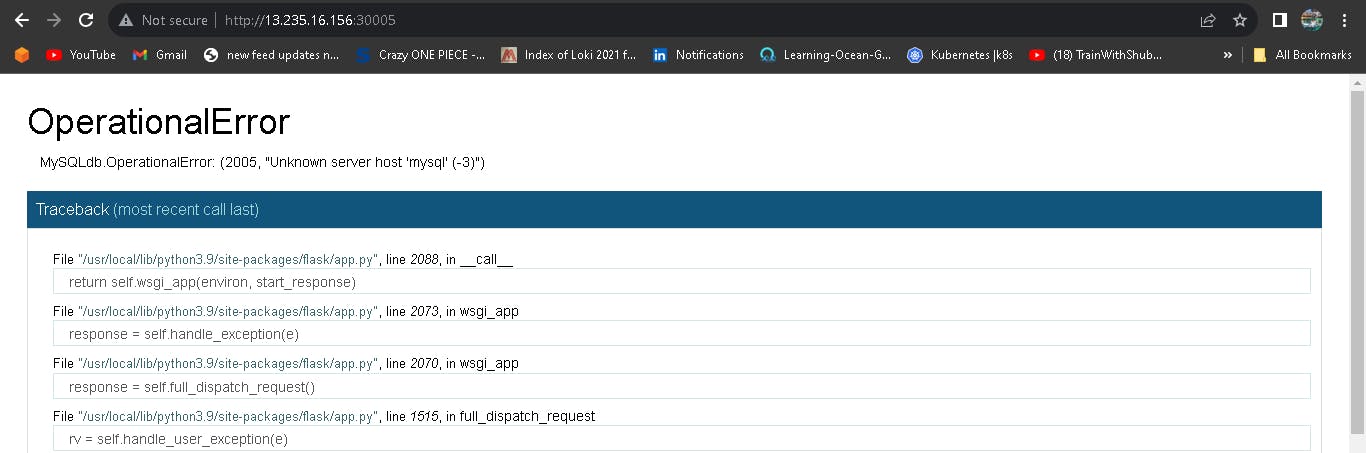
Note: FOR connection between Application and Database I am copying mysql CLUSTER-IP and pasting it into MYSQL_HOST (two-tier-deployment-app.yml)
- open your web application deployment file.
vim two-tier-deployment-app.yml
NOTE (add cluster ip of mysql service)
- name: MYSQL_HOST
  value: "10.102.243.87"
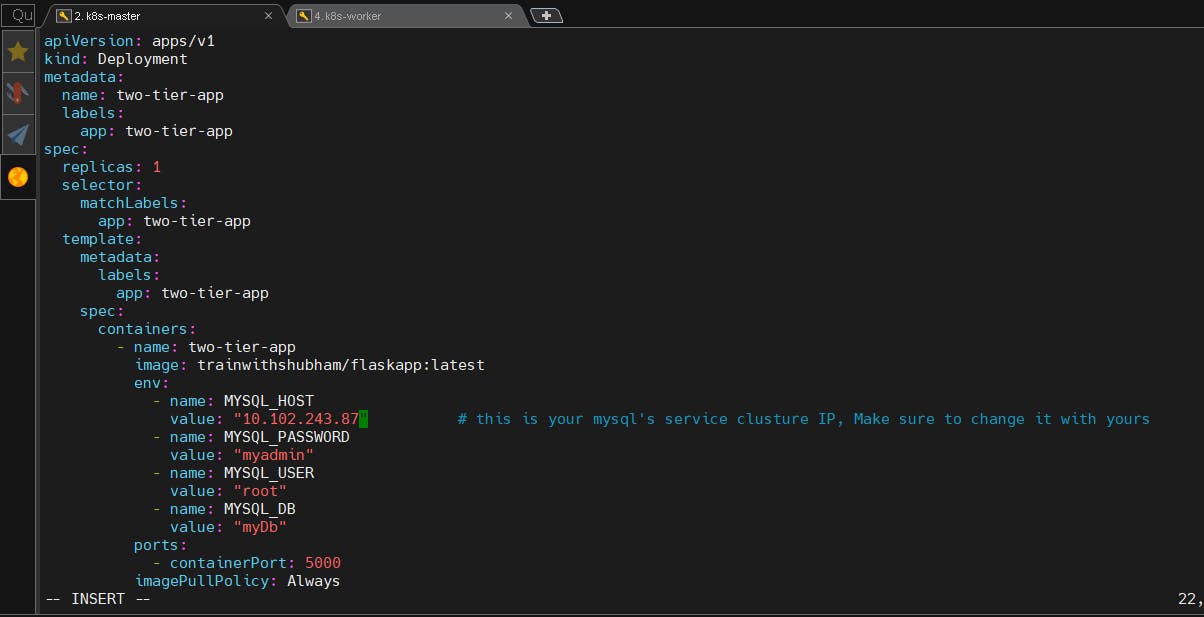
- Update Kubernetes resources which is deployment.
kubectl apply -f two-tier-deployment-app.yml

- Data base connected successfully but the table "myDb.messages" is not present
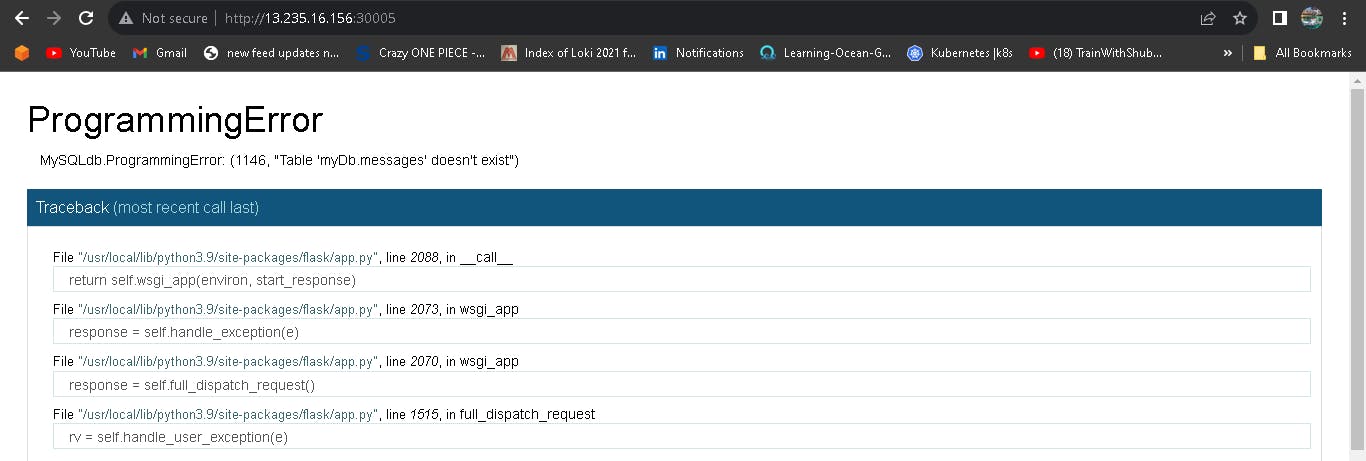
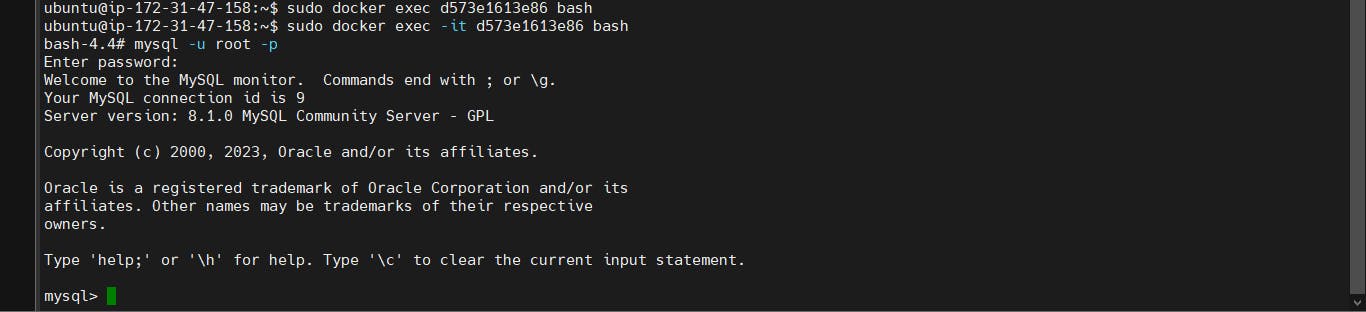
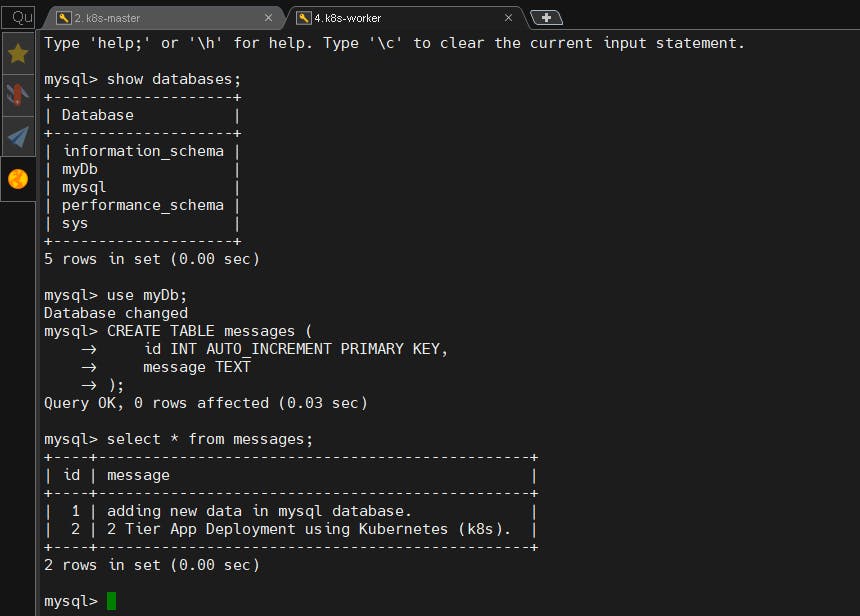
- Create the Message table in your MySQL Database but before creating a table access the MySql Database and then enter in the mysql with the following commands.
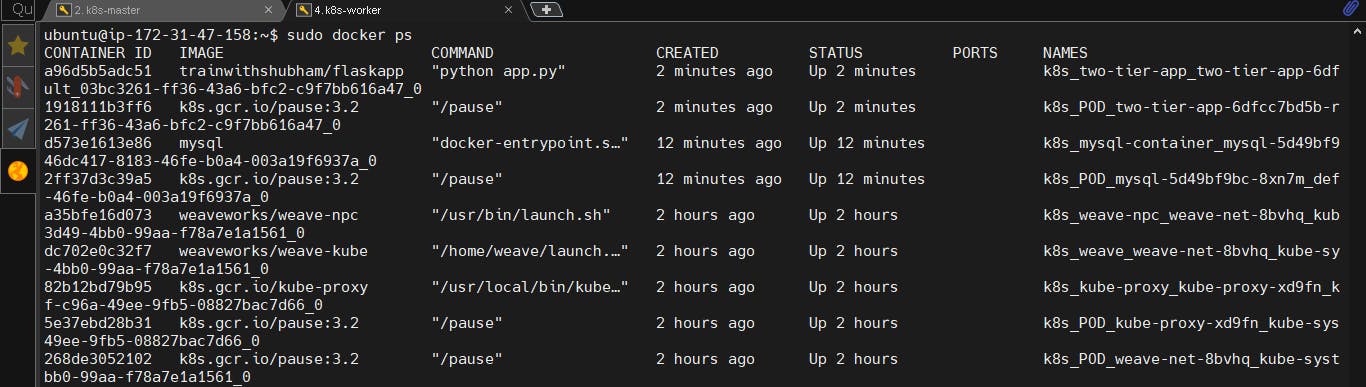
sudo docker exec -it <container-id> bash
sudo mysql -u root -p
enter password:
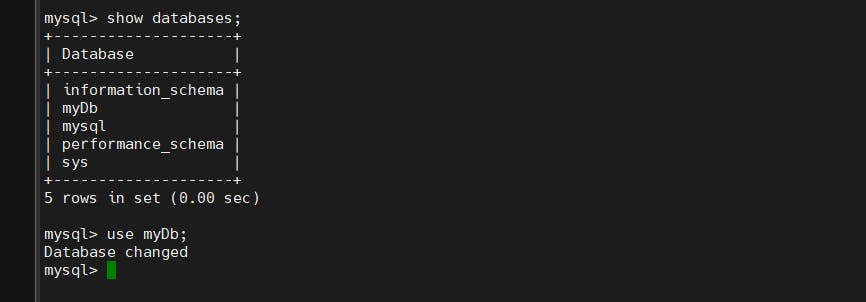
- Check the Databases, use myDb and then create a table with the help of the following commands. use the syntax directly copy and paste it to your terminal.
show databases;
use myDb;

CREATE TABLE messages (
    id INT AUTO_INCREMENT PRIMARY KEY,
    message TEXT
);
- After Creating the table access your 2-Tier Flask Deployment App on your browser: with the help of the following syntax:
http://<ec2-instance-public-ip>:30005
http://13.235.16.156:30005
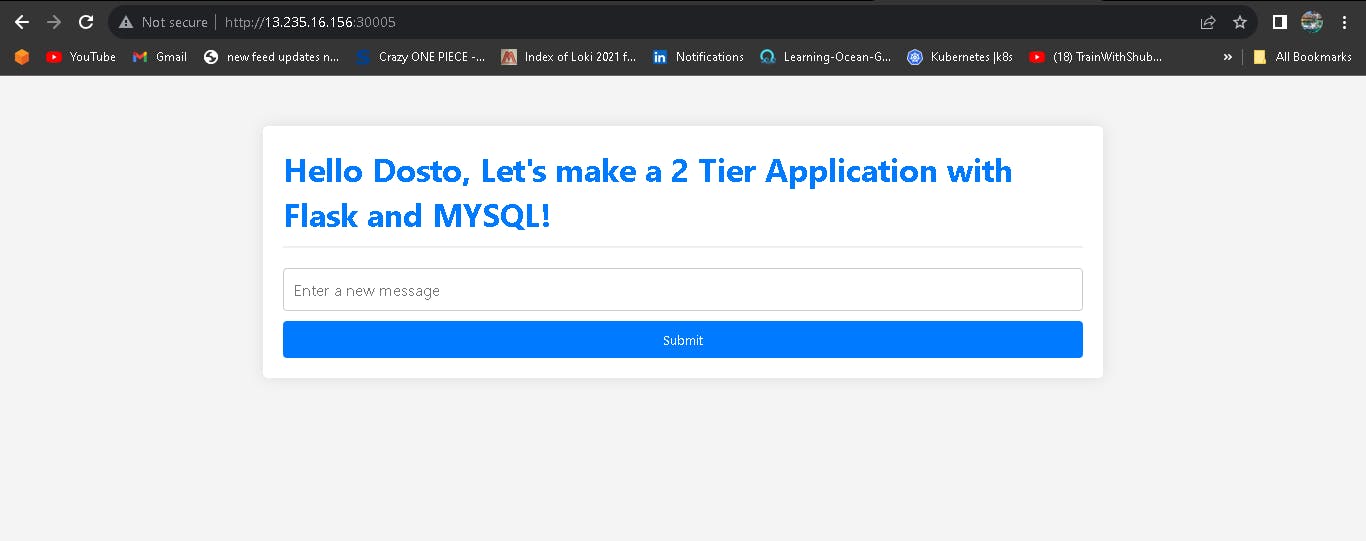
- Add some messages and submit them for testing purposes.

- Verify that data in the databases.
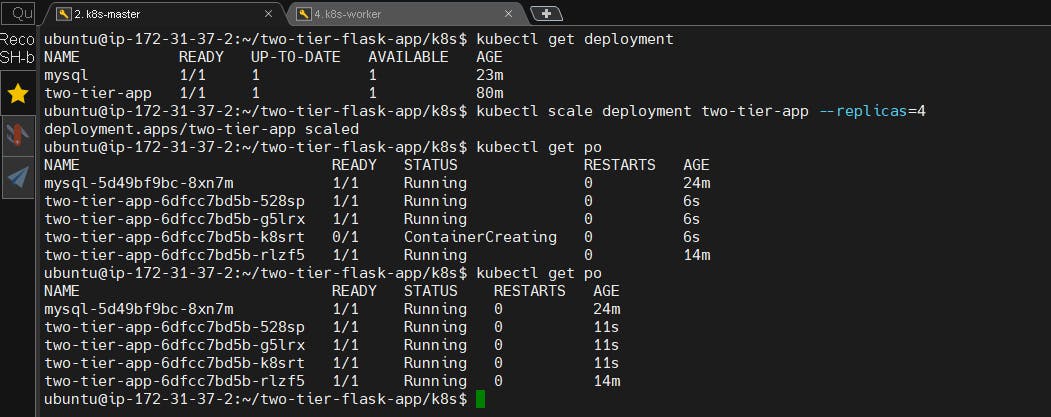
- Let's consider if traffic increases, then you auto-scale your pods.
kubectl get deployment
kubectl scale deployment two-tier-app --replicas=4
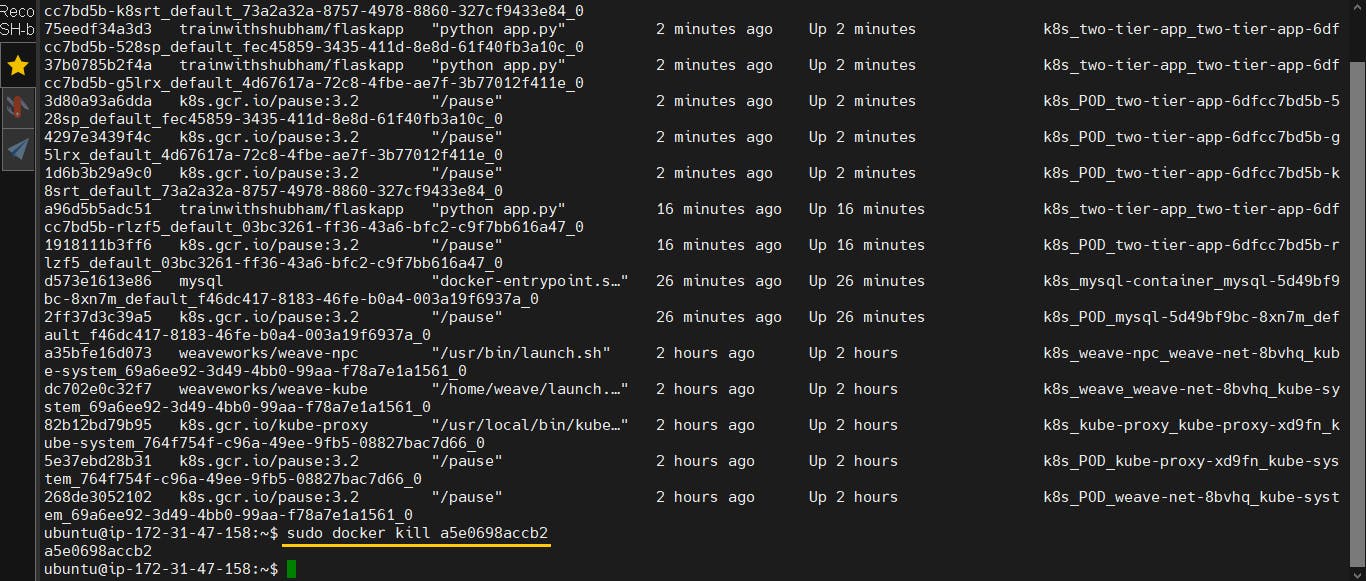
- Let's consider if your pod is deleted, then your pod auto-heals itself.
For example, I move into the worker node and delete one pode for testing the feature of auto-healing.
# Worker Node [ Data Plane ]
sudo docker ps
sudo docker kill <container-id>
# master node [ Control Plane ]
kubectl get po
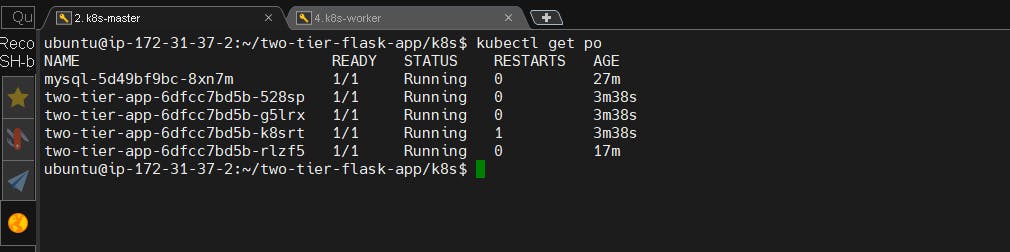
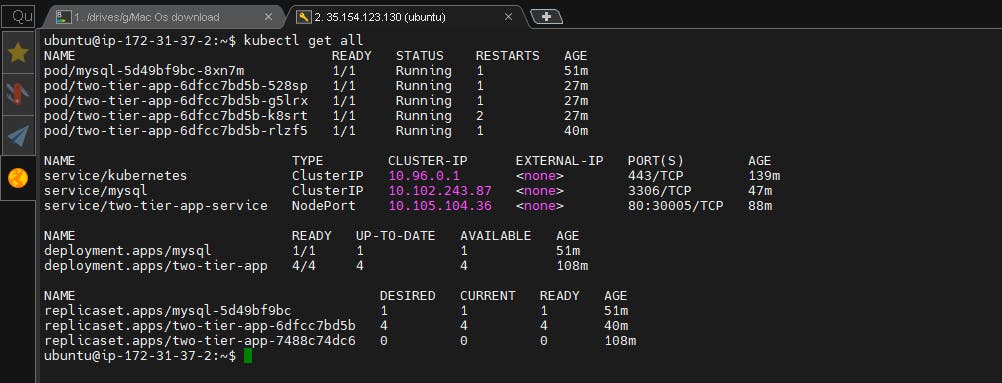
- Kubernetes will attempt to list resources of multiple types that are common and supported in your cluster. The specific resource types included may vary depending on your cluster's configuration and installed resources, but it typically includes common types like pods, services, deployments, and replicasets.
kubectl get all
Follow for many such contents:
LinkedIn: linkedin.com/in/dushyant-kumar-dk