Running Node app using Helm Chart 👨💻

🌟 Introduction:
In this blog post, we will walk you through the process of deploying a Docker image from Docker Hub using Helm. Helm is a powerful package manager for Kubernetes that allows you to define, install, and upgrade even the most complex Kubernetes applications.
Helm is a valuable tool in the DevOps toolbox, streamlining Kubernetes deployments and making it easier to manage your complex applications in a containerized environment. 🚢📦
🌟 Why Helm?
Helm solves several challenges in the Kubernetes deployment process:
Package Management: Helm allows you to package your application, including all its dependencies and configurations, into a single unit called a "chart." This simplifies the distribution and installation of complex applications.
Version Control: Helm charts can be versioned and stored in a chart repository, making it easy to manage different versions of your application and rollback to previous versions if needed.
Templating: Helm uses Go templates to generate Kubernetes manifest files dynamically, enabling you to customize deployments for different environments (e.g., development, production) without duplicating code.
Upgrade and Rollback: Helm simplifies the process of upgrading and rolling back applications, ensuring smooth updates and minimizing downtime.
Collaboration: Teams can collaborate more effectively by sharing and reusing Helm charts, reducing the risk of configuration errors.
Real-World Example: Imagine you are managing a microservices-based application with multiple services that need to be deployed and scaled independently. Helm allows you to create charts for each service, define their dependencies, and manage their deployments as a cohesive application. When you need to update a service or roll back to a previous version due to issues, Helm simplifies the process, making your DevOps tasks more efficient and error-free.
🌟 Prerequisites:
📍 Make sure you have the following prerequisites:
Kubernetes cluster: You should have a Kubernetes cluster up and running. I am using Kubeadm with one control plane and one data plane.
Helm: Helm should be installed on your local machine/ virtual machine/ ec2-instances.
Use these commands to install helm in k8s cluster.
      curl https://baltocdn.com/helm/signing.asc | gpg --dearmor | sudo tee /usr/share/keyrings/helm.gpg > /dev/null
      sudo apt-get install apt-transport-https --yes
      echo "deb [arch=$(dpkg --print-architecture) signed-by=/usr/share/keyrings/helm.gpg] https://baltocdn.com/helm/stable/debian/ all main" | sudo tee /etc/apt/sources.list.d/helm-stable-debian.list
      sudo apt-get update
      sudo apt-get install helm

Docker: You need Docker installed on your local machine/ virtual machine/ ec2 instance for building and pushing Docker images.
  kubectl get no # no is for nodes
  kubectl get all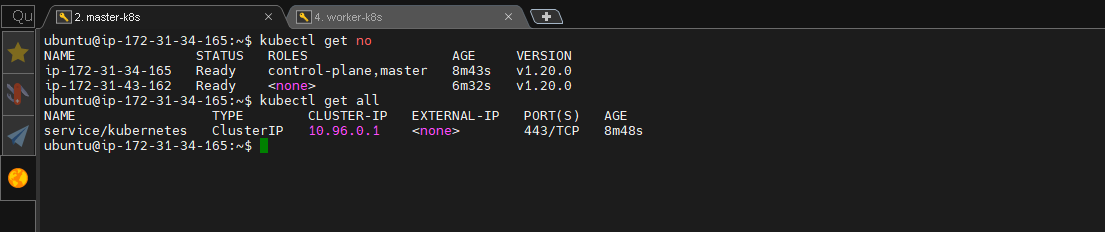
📌 Step 1: Create a Helm Chart
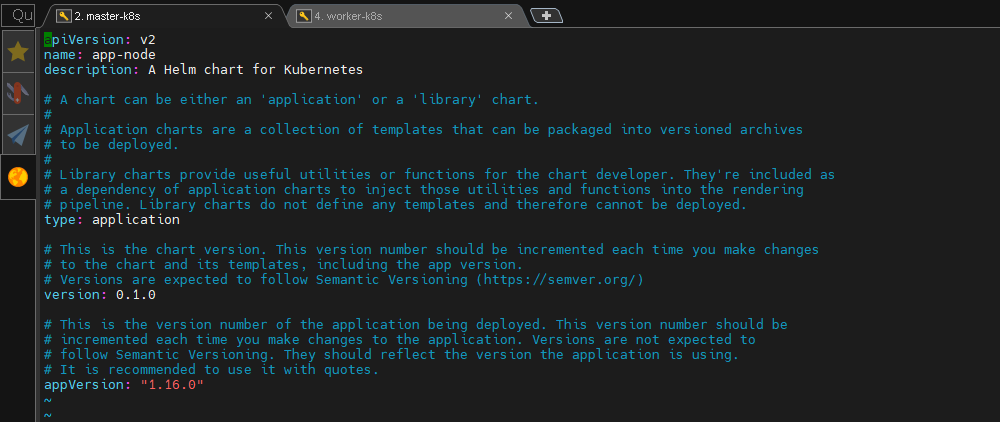
First, we need to create a Helm chart to define the deployment of our application. Open your terminal and run the following command to create a Helm chart named "app-node":
helm create app-node
sudo apt-get install tree -y
tree app-node


This command generates a directory structure for your Helm chart with default templates and values.
Chart.yaml
Contains the metadata of the helm
📌 Step 2: Edit values.yaml
Navigate to the "app-node" directory and open the "values.yaml" file in your preferred text editor. Update the file to match the specifications you provided in your question: such as replicaCount, repository, service, autoscaling,etc.
replicaCount: 2

image:
  repository: trainwithshubham/node-app-test-new
  pullPolicy: Always
  # Overrides the image tag whose default is the chart appVersion.
  tag: "latest"

imagePullSecrets: []
nameOverride: ""
fullnameOverride: ""

serviceAccount:
  # Specifies whether a service account should be created
  create: true
  # Annotations to add to the service account
  annotations: {}
  # The name of the service account to use.
  # If not set and create is true, a name is generated using the fullname template
  name: ""

podAnnotations: {}

podSecurityContext: {}
  # fsGroup: 2000

securityContext: {}
  # capabilities:
  #   drop:
  #   - ALL
  # readOnlyRootFilesystem: true
  # runAsNonRoot: true
  # runAsUser: 1000

service:
  type: NodePort
  port: 8000
  targetPort: 8000
  nodePort: 30010

ingress:
  enabled: false
  className: ""
  annotations: {}
    # kubernetes.io/ingress.class: nginx
    # kubernetes.io/tls-acme: "true"
  hosts:
    - host: chart-example.local
      paths:
        - path: /
          pathType: ImplementationSpecific
  tls: []
  #  - secretName: chart-example-tls
  #    hosts:
  #      - chart-example.local

resources: {}
  # We usually recommend not to specify default resources and to leave this as a conscious
  # choice for the user. This also increases chances charts run on environments with little
  # resources, such as Minikube. If you do want to specify resources, uncomment the following
  # lines, adjust them as necessary, and remove the curly braces after 'resources:'.
  # limits:
  #   cpu: 100m
  #   memory: 128Mi
  # requests:
  #   cpu: 100m
  #   memory: 128Mi

autoscaling:
  enabled: false
  minReplicas: 1
  maxReplicas: 4
  targetCPUUtilizationPercentage: 50
  # targetMemoryUtilizationPercentage: 80

nodeSelector: {}

tolerations: []

affinity: {}

This configuration specifies the number of replicas, Docker image details, and service specifications for your application.


📌 Step 3: Deploy the Helm Chart
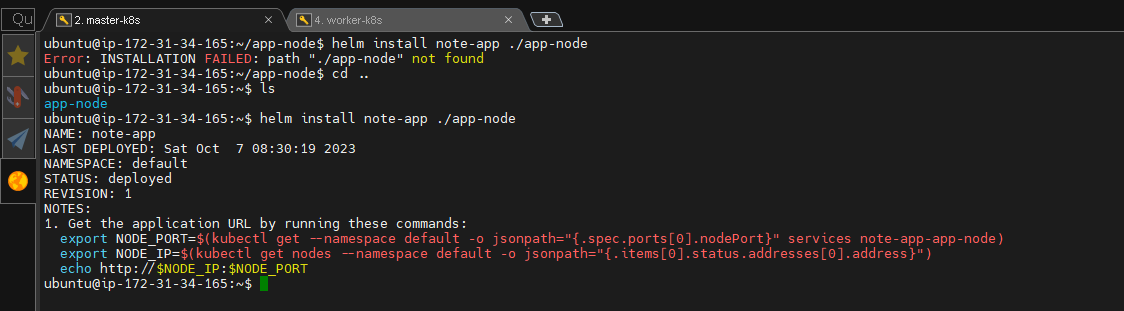
Now that our Helm chart is configured, we can deploy our application to the Kubernetes cluster.
This command deploys the "app-node" Helm chart to your Kubernetes cluster. Helm will create all the necessary Kubernetes resources based on the configuration in your chart.
Install a helm chart using install command
$ helm install <FIRST_ARGUMENT_RELEASE_NAME> <SECOND_ARGUMENT_CHART_NAME>
helm install note-app ./app-node
📌 Step 4: Verify the Deployment
To verify that your application has been deployed successfully, you can run the following command to list all the deployments in your cluster:
helm list -a
kubectl get deployments
or
kubectl get all
You should see the "app-node" deployment listed with the desired number of replicas.

📌 Step 5: Access Your Application
To access your application, you can use the NodePort service you defined in the "values.yaml" file. Find the NodePort assigned to your service:
kubectl get svc
kubectl get po

Locate the "node-app" service and note the port under "PORT(S)". You can now access your application using your Kubernetes cluster's IP address and the NodePort.
📌 Application Output
You have successfully deployed a Docker image from Docker Hub using Helm. Helm makes it easy to define and manage complex Kubernetes deployments, making it an essential tool for DevOps engineers working with Kubernetes.

\...................................................................................................................................................
The above information is up to my understanding. Suggestions are always welcome. Thanks for reading this article.😊
#aws #cloudcomputing #docker #Devops #TrainWithShubham #90daysofdevopsc #happylearning
Follow for many such contents:
LinkedIn: linkedin.com/in/dushyant-kumar-dk


